SDK Overview
Bugnet provides official SDKs for the most popular game engines. Each SDK handles bug report submission, crash log collection, screenshot capture, session tracking, performance profiling, and player context — all with a single init call.
All SDKs are lightweight, single-file packages that add zero performance overhead and can be integrated in under five minutes.
Unity
C# package — Unity 2020.3+
Godot
GDScript addon — Godot 4.x
Unreal Engine
C++ plugin — UE5
Web / HTML5
JavaScript module — any browser
Construct 3
Native addon (SDK v2) — Construct 3 r401+
GameMaker
GML script — GameMaker Studio 2+
Pygame
Python module — Pygame 2.x / Python 3.8+
Unity SDK
The Unity SDK is a lightweight C# package that integrates directly into your project. It provides an in-game bug report widget, automatic crash logging, screenshot capture, session tracking, and performance profiling.
Quick Install
Run one command from your Unity project root (where Assets/ is located). This downloads the SDK into Assets/Scripts/ automatically.
curl -s https://bugnet.io/sdks/unity/install.sh | bashpowershell -ExecutionPolicy Bypass -c "& { iwr -useb https://bugnet.io/sdks/unity/install.ps1 -OutFile $env:TEMP\bugnet.ps1; & $env:TEMP\bugnet.ps1 }"Manual Installation
- Download
BugnetSDK.csfrom/sdks/unity/BugnetSDK.cs - Drop it into your
Assets/Scripts/folder - Create an empty GameObject in your first scene and attach the
BugnetSDKcomponent - Fill in your API Key and Server URL in the Inspector, or call
Init()from code
Configuration
// Initialize with your API key and server URL
BugnetSDK.Instance.Init(
  "YOUR_API_KEY",
  "https://api.bugnet.io"
);
Reporting Bugs
// Report a bug programmatically
BugnetSDK.Instance.ReportBug(
  "Bug title",
  "Bug description",
  category: "gameplay",
  priority: "high",
  includeScreenshot: true
);
Session Tracking
// Sessions are tracked automatically after Init().
// The session ends automatically when the game quits
// or the BugnetSDK GameObject is destroyed.
Performance Profiling
// Performance data (FPS, frame time, memory) is captured
// automatically and sent with each bug report.
Session Replays
Studio PlusSession replays record mouse movement, clicks, and key presses during gameplay. When a bug is reported, the replay is automatically attached so developers can see exactly what the player was doing.
Session replay is controlled by the server — enable it in Project Settings > Session Capture (requires a paid plan). The SDK checks this setting on init and will only record and submit replays when enabled.
// Session replay is automatic — no code needed.
// Once enabled in Project Settings, the SDK records
// input events and sends them with each bug report.
Event Tracking
Studio+Track custom analytics events like level completions, item pickups, and player actions. Event data is aggregated in the dashboard with daily trends and platform breakdowns.
// Track a single event with optional data (max 4KB)
BugnetSDK.Instance.TrackEvent("level_completed", new { level = 3, time = 42.5f });

// Track multiple events in a single batch (up to 50)
BugnetSDK.Instance.TrackEvents(new EventItem[] {
  new EventItem { eventName = "item_collected", eventData = new { item = "sword" } },
  new EventItem { eventName = "enemy_killed", eventData = new { enemy = "boss" } }
});
Godot SDK
The Godot SDK is a GDScript addon for Godot 4.x. Install it as an autoload and it handles everything automatically.
Quick Install
Run one command from your Godot project root (where project.godot lives). This downloads the SDK and registers the autoload automatically.
curl -s https://bugnet.io/sdks/godot/install.sh | bashpowershell -ExecutionPolicy Bypass -c "& { iwr -useb https://bugnet.io/sdks/godot/install.ps1 -OutFile $env:TEMP\bugnet.ps1; & $env:TEMP\bugnet.ps1 }"This will:
- Download
BugnetSDK.gdintoaddons/bugnet/ - Add the Bugnet autoload entry to
project.godot
Manual Installation
- Download
BugnetSDK.gd - Save it to
addons/bugnet/in your project - Go to Project > Project Settings > Autoload
- Add the script with name Bugnet
- Set
api_keyandserver_urlin the exported properties
Configuration
# bugnet_controller.gd — add BugnetSDK.gd as an Autoload named "Bugnet"
extends Node

var _bugnet_widget_open: bool = false

func _ready() -> void:
  Bugnet.bugnet_init(
    "YOUR_API_KEY",
    "https://api.bugnet.io"
  )

  Bugnet.bug_reported.connect(_on_bug_reported)

func _on_bug_reported(title: String) -> void:
  print("Bug reported: ", title)
Reporting Bugs
# F1 toggles the widget, ESC closes it
func _input(event) -> void:
  if event is InputEventKey and event.pressed and event.keycode == KEY_F1:
    if _bugnet_widget_open:
      if Bugnet.has_method("hide_widget"):
        Bugnet.hide_widget()
      elif Bugnet.has_method("close_widget"):
        Bugnet.close_widget()
      _bugnet_widget_open = false
    else:
      Bugnet.show_widget()
      _bugnet_widget_open = true
    return

  if event is InputEventKey and event.pressed and event.keycode == KEY_ESCAPE:
    if _bugnet_widget_open:
      if Bugnet.has_method("hide_widget"):
        Bugnet.hide_widget()
      elif Bugnet.has_method("close_widget"):
        Bugnet.close_widget()
      _bugnet_widget_open = false
    return

# Or report programmatically
Bugnet.report_bug("Title", "Description", "gameplay", "high")
Attaching a Screenshot
Pass include_screenshot = true as the final argument to report_bug() to attach a screenshot of the current viewport to the request. The SDK captures the frame, encodes it as a base64 PNG, and sends it in the report's screenshot field — it shows up alongside the bug in your dashboard.
# report_bug(title, description, category, priority, steps, include_screenshot)
Bugnet.report_bug(
  "Texture flickers on load",
  "The ground texture flashes white for one frame.",
  "visual",
  "medium",
  "Load the forest level and watch the floor.", # steps to reproduce
  true                                            # include_screenshot
)Note: The screenshot is only captured and attached when Screenshot Capture is enabled for your project (the SDK reads this setting on bugnet_init()). If it's turned off in your project's Settings, passing include_screenshot = true has no effect. The widget's Submit button attaches a screenshot automatically using the same setting — see Screenshot capture below.
Attaching Files & Custom Metadata
report_bug() accepts two more optional arguments: a metadata Dictionary of free-form context, and an attachments Array of file paths. The SDK reads each file, base64-encodes it, and uploads it with the report — text, image, video, and JSON files are supported (up to 10 files, 10 MB each; oversized or unreadable files are skipped with a warning). The metadata is stored on the report and shown in the dashboard.
# report_bug(title, description, category, priority, steps, include_screenshot, metadata, attachments)
Bugnet.report_bug(
  "Quest reward never granted",
  "Finished 'The Long Road' but got no XP.",
  "gameplay",
  "high",
  "",                                  # steps
  false,                               # include_screenshot
  {"quest_id": "long_road", "build": 1423},  # metadata
  ["user://player.log", "user://save.json"]   # attachments
)Note: Attachment paths use Godot's virtual filesystem (user:// for the writable user directory, res:// for bundled resources). The same metadata and attachments options are available in every Bugnet SDK and via the public POST /api/bugs/submit API.
Uploading Files to Auto-Captured Reports
Auto-captured crashes and errors are reported by the SDK for you, so there's no report_bug() call to pass attachments to. For those, connect to the bug_reported_id signal — it fires after any report is accepted and hands you the new bug's id — then call upload_attachment() to attach your own context (the full log file, a save game, a state dump). The upload runs in the background and uses your project's API key, so no dashboard login is required.
func _ready() -> void:
  Bugnet.bugnet_init("YOUR_API_KEY", "https://api.bugnet.io")

  # Fires for every accepted report — manual or auto-captured.
  Bugnet.bug_reported_id.connect(_on_bug_reported_id)

func _on_bug_reported_id(bug_id: String, report_number: int, title: String) -> void:
  # Attach a file from disk…
  Bugnet.upload_attachment(bug_id, "user://logs/last_run.log")

  # …or attach context you build in memory, no temp file needed.
  var snapshot = JSON.stringify({"scene": get_tree().current_scene.name, "player_hp": 12})
  Bugnet.upload_attachment_bytes(bug_id, "state.json", snapshot.to_utf8_buffer())
Both calls accept text, image, video, and JSON files (up to 10 MB each). Listen for attachment_uploaded(bug_id, filename) and attachment_upload_failed(bug_id, reason) if you need to react to the result. Under the hood this is a POST /api/bugs/{id}/attachments request authenticated with your API key.
This same pattern is built into every Bugnet SDK — a hook that hands you the new bug id after each accepted report, plus an upload method:
| SDK | Report hook | Upload method |
|---|---|---|
| Godot | bug_reported_id signal | upload_attachment() / upload_attachment_bytes() |
| Unity | BugReported event | UploadAttachment() / UploadAttachmentBytes() |
| Unreal | OnBugReportedId delegate | UploadAttachment() / UploadAttachmentBytes() |
| Web & Construct 3 | onBugReported init callback | uploadAttachment() / uploadAttachmentBytes() |
| Pygame | set_on_bug_reported() | upload_attachment() / upload_attachment_bytes() |
| GameMaker | bugnet_set_on_bug_reported() | bugnet_upload_attachment() / bugnet_upload_attachment_buffer() |
Customizing the Widget
The report widget is built entirely from Godot Control nodes in the _create_widget() function of addons/bugnet/BugnetSDK.gd — there are no scenes or external assets. The most common tweaks are exposed as exported properties on the Bugnet autoload, grouped under Widget in the Inspector, so you can restyle it without touching code. For anything beyond those, edit _create_widget() directly.
Match your game's look with a Theme
Godot automatically applies your project's default Theme to every Control node, including the widget overlay. The cleanest way to make the widget match your game is to point the project at a theme resource:
- Create or open a
Themeresource (e.g.res://ui/game_theme.tres) - Go to Project > Project Settings > GUI > Theme
- Set Custom to your theme resource
Fonts, colors, and control styles from that theme are picked up automatically the next time show_widget() is called — no code changes needed. To theme only the widget (and not the rest of your game), set the widget_theme property on the Bugnet autoload — either from the Inspector's Widget group, or in code before showing it:
# Apply a custom theme to the widget overlay only
Bugnet.widget_theme = preload("res://ui/bugnet_theme.tres")
Bugnet.show_widget()
Change labels, placeholders, and categories
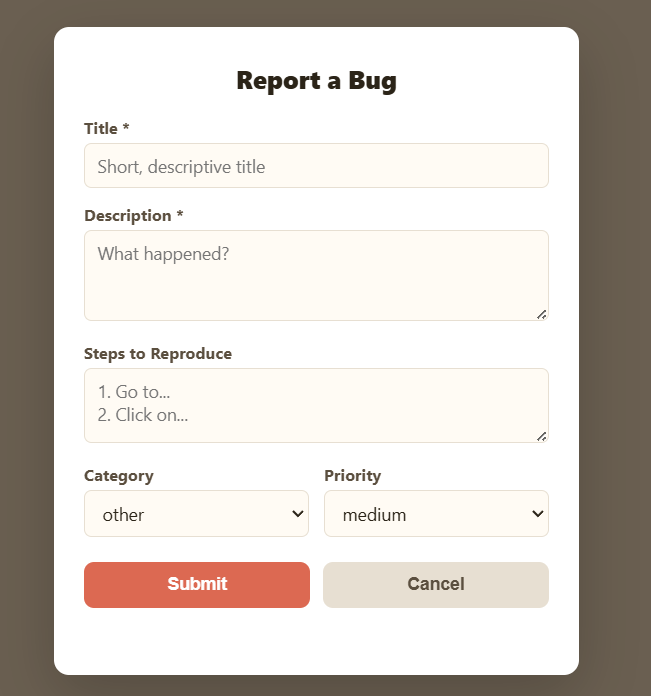
Set the exported Widget properties on the Bugnet autoload — from the Inspector, or in code before calling show_widget():
# Window heading — change "Report a Bug" to anything you like
Bugnet.widget_header_text = "Send Feedback"

# Field placeholder text
Bugnet.widget_title_placeholder = "Short, descriptive title"
Bugnet.widget_desc_placeholder = "What happened?"

# Categories shown in the dropdown — add, remove, or reorder
Bugnet.widget_categories = ["crash", "visual", "gameplay", "other"]

# Button labels
Bugnet.widget_submit_label = "Send"
Bugnet.widget_cancel_label = "Close"Tip: The overlay's dimming color is set by the widget_overlay_color property (default Color(0, 0, 0, 0.5)) — lower the alpha for a lighter backdrop, or change the RGB to tint it. Use widget_layer to control which CanvasLayer the widget draws on so it can sit above your game's own UI.
Screenshot capture
Screenshots are attached automatically when a report is submitted, gated by your project's server settings. Toggle Screenshot Capture from your project's Settings card on the Projects page in the dashboard — turn it off if your game shows sensitive content. The SDK reads this setting on bugnet_init(), so no code change is required.
Session Tracking
# Sessions start automatically on init.
# The session ends automatically when the game quits.
Session Replays
Studio PlusWhen session capture is enabled on your project, the Godot SDK automatically records mouse movement, clicks, and key presses. Replay data is submitted alongside each bug report.
Enable session capture in Project Settings > Session Capture (requires a paid plan). No additional code is needed.
Event Tracking
Studio+Track custom analytics events from your game. Events are aggregated in the dashboard with daily trends, platform breakdowns, and unique session counts.
# Track a single event with optional data (max 4KB)
Bugnet.track_event("level_completed", {"level": 3, "time": 42.5})

# Track multiple events in a single batch (up to 50)
Bugnet.track_events([
  {"event_name": "item_collected", "event_data": {"item": "sword"}},
  {"event_name": "enemy_killed", "event_data": {"enemy": "boss"}},
])
Unreal Engine SDK
The Unreal SDK is a C++ plugin that integrates with the Unreal Engine 5 subsystem architecture.
Quick Install
Run one command from your Unreal project root (where your .uproject file is located). This downloads the SDK files into Source/<ProjectName>/ automatically.
curl -s https://bugnet.io/sdks/unreal/install.sh | bashpowershell -ExecutionPolicy Bypass -c "& { iwr -useb https://bugnet.io/sdks/unreal/install.ps1 -OutFile $env:TEMP\bugnet.ps1; & $env:TEMP\bugnet.ps1 }"After running the installer, add the following module dependencies to your .Build.cs if not already present:
"HTTP","Json","JsonUtilities"
Manual Installation
- Copy
BugnetSDK.handBugnetSDK.cppinto your project'sSource/folder - Add
"HTTP","Json","JsonUtilities"to your.Build.csPublicDependencyModuleNames - The SDK is a
UGameInstanceSubsystem— access it viaGetGameInstance()->GetSubsystem<UBugnetSDK>()
Configuration
// Get the SDK subsystem from GameInstance
UBugnetSDK* Bugnet = GetGameInstance()
  ->GetSubsystem<UBugnetSDK>();

// Initialize with API key and server URL
Bugnet->Initialize(
  TEXT("YOUR_API_KEY"),
  TEXT("https://api.bugnet.io")
);
Reporting Bugs
// Report a bug programmatically
Bugnet->ReportBug(
  TEXT("Bug title"),
  TEXT("Bug description"),
  TEXT("gameplay"),
  TEXT("high")
);
Session Replays
Studio PlusThe Unreal SDK records mouse movement and clicks during gameplay. When a bug is reported, the replay data is automatically attached. Enable session capture in Project Settings > Session Capture (requires a paid plan).
Event Tracking
Studio+Track custom analytics events from your game. Events are aggregated in the dashboard with daily trends, platform breakdowns, and unique session counts.
// Get the Bugnet subsystem
UBugnetSDK* Bugnet = GetGameInstance()->GetSubsystem<UBugnetSDK>();

// Track a single event with optional JSON data (max 4KB)
Bugnet->TrackEvent(TEXT("level_completed"), TEXT("{\"level\":3,\"time\":42.5}"));

// Track multiple events in a batch (up to 50)
TArray<FString> Names = { TEXT("item_collected"), TEXT("enemy_killed") };
TArray<FString> Data = { TEXT("{\"item\":\"sword\"}"), TEXT("{\"enemy\":\"boss\"}") };
Bugnet->TrackEvents(Names, Data);
Web / HTML5 SDK
For browser-based games, use the JavaScript SDK. It works with any web game framework — Phaser, PixiJS, Three.js, or plain canvas.
Quick Install
Run one command from your web project root to download the SDK locally:
curl -s https://bugnet.io/sdks/web/install.sh | bashpowershell -ExecutionPolicy Bypass -c "& { iwr -useb https://bugnet.io/sdks/web/install.ps1 -OutFile $env:TEMP\bugnet.ps1; & $env:TEMP\bugnet.ps1 }"CDN / Script Tag
Or include via a script tag (no download needed):
<script src="https://bugnet.io/sdks/web/bugnet-sdk.js"></script>Configuration
Bugnet.init({
  apiKey:    'YOUR_API_KEY',
  serverUrl: 'https://api.bugnet.io',
  gameVersion: '1.0.0'
});
Reporting Bugs
// Show the bug report widget
Bugnet.showWidget();

// Or report programmatically
Bugnet.reportBug('Bug title', 'Description', {
  category: 'gameplay',
  priority: 'high',
  includeScreenshot: true
});
Session Tracking
// Sessions are tracked automatically after init.
// The session ends automatically on page unload.
Session Replays
Studio PlusThe Web SDK records mouse movement, clicks, key presses, scroll, and resize events. Replay data is automatically sent when a bug is reported. Enable session capture in Project Settings > Session Capture (requires a paid plan).
Events are capped at 5,000 per session and mouse movement is throttled to 50ms intervals to keep payloads small.
Event Tracking
Studio+Track custom analytics events from your game. Events are aggregated in the dashboard with daily trends, platform breakdowns, and unique session counts.
// Track a single event with optional data (max 4KB)
Bugnet.trackEvent("level_completed", { level: 3, time: 42.5 });

// Track multiple events in a single batch (up to 50)
Bugnet.trackEvents([
  { eventName: "item_collected", eventData: { item: "sword" } },
  { eventName: "enemy_killed", eventData: { enemy: "boss" } }
]);
Construct 3 Addon
The Bugnet addon integrates directly with Construct 3 as a first-class plugin (SDK v2). It requires Construct 3 r401+ and provides crash capture, bug reporting, session tracking, and performance profiling. Use it from Event Sheets or JavaScript scripting.
Installation
- Download
bugnet.c3addon - Open your project in Construct 3
- Drag and drop the
.c3addonfile into the editor to install - In the Project Bar, right-click Object types → Insert new object → select Bugnet
Event Sheet Usage
Use the Bugnet object's actions directly in your event sheets — no JavaScript required:
- Initialize — call on start of layout with your API key, server URL, game version, and auto-capture setting
- Report bug — submit a bug report with title, description, category, and priority
- Show widget / Hide widget — show or hide the built-in bug report overlay
- Set player — set player ID and name for bug reports
- Layout load start / Layout load end — track layout load times
JavaScript Scripting
You can also use Bugnet from Construct 3's JavaScript scripting system:
runOnStartup(async runtime => {
  runtime.addEventListener("beforeprojectstart", () => {
    const bugnet = runtime.objects.Bugnet.getFirstInstance();
    bugnet.initialize("YOUR_API_KEY", "https://api.bugnet.io", "1.0.0");
  });
});
Reporting Bugs
// Show the bug report widget
bugnet.showWidget();

// Or report programmatically
bugnet.reportBug("Bug title", "Description", "gameplay", "high");
Bug Report Widget
The built-in widget gives players a polished bug report form without any extra UI work:
Script Interface Reference
| Method | Description |
|---|---|
initialize(apiKey, serverUrl?, gameVersion?, autoCaptureErrors?) | Initialize the SDK |
reportBug(title, description, category?, priority?) | Submit a bug report |
showWidget() | Show the bug report overlay |
hideWidget() | Hide the bug report overlay |
setPlayer(playerId, playerName) | Set player identity |
| Getter | Returns |
|---|---|
isInitialized | boolean |
gameVersion | string |
platform | string |
sessionToken | string |
lastBugId | string |
Session Tracking
Sessions are tracked automatically after initialization. The session ends on page unload or when the tab is hidden.
Session Replays
Studio PlusWhen session capture is enabled on your project, the addon records canvas video replays. Replay data is submitted alongside each bug report.
Enable session capture in Project Settings > Session Capture (requires a paid plan). No additional code is needed.
Event Tracking
Studio+Track custom analytics events from your game. Events are aggregated in the dashboard with daily trends, platform breakdowns, and unique session counts.
// Track a single event with optional data (max 4KB)
Bugnet.trackEvent("level_completed", { level: 3, time: 42.5 });

// Track multiple events in a single batch (up to 50)
Bugnet.trackEvents([
  { eventName: "item_collected", eventData: { item: "sword" } },
  { eventName: "enemy_killed", eventData: { enemy: "boss" } }
]);
GameMaker SDK
The GameMaker SDK is a pure GML script that works with GameMaker Studio 2 and GameMaker 2024+. Drop it into your scripts folder and call the init function.
Quick Install
Run one command from your GameMaker project root (where your .yyp file is located). This downloads the SDK into scripts/BugnetSDK/ automatically.
curl -s https://bugnet.io/sdks/gamemaker/install.sh | bashpowershell -ExecutionPolicy Bypass -c "& { iwr -useb https://bugnet.io/sdks/gamemaker/install.ps1 -OutFile $env:TEMP\bugnet.ps1; & $env:TEMP\bugnet.ps1 }"Manual Installation
- Download
BugnetSDK.gml - In GameMaker, right-click Scripts in the Asset Browser and choose Create Script
- Name it BugnetSDK and paste the contents of the downloaded file
- Call
bugnet_init("YOUR_API_KEY", "https://api.bugnet.io")in your first room's Creation Code or a controller object's Create event
Configuration
// Initialize in a controller object's Create event
bugnet_init("YOUR_API_KEY", "https://api.bugnet.io");
Reporting Bugs
// Show the in-game widget
if (keyboard_check_pressed(vk_f1)) {
    bugnet_show_widget();
}

// Or report programmatically
bugnet_report_bug("Title", "Description", "gameplay", "high");
Session Tracking
// Sessions start automatically on init
// Manual session control:
bugnet_end_session();
Session Replays
Studio PlusWhen session capture is enabled on your project, the GameMaker SDK automatically records mouse movement, clicks, and key presses. Replay data is submitted alongside each bug report.
Enable session capture in Project Settings > Session Capture (requires a paid plan). No additional code is needed.
Event Tracking
Studio+Track custom analytics events from your game. Events are aggregated in the dashboard with daily trends, platform breakdowns, and unique session counts.
// Track a single event with optional data (max 4KB)
bugnet_track_event("level_completed", { level: 3, time: 42.5 });

// Track multiple events in a single batch (up to 50)
bugnet_track_events([
  { event_name: "item_collected", event_data: { item: "sword" } },
  { event_name: "enemy_killed", event_data: { enemy: "boss" } }
]);
Pygame SDK
The Pygame SDK works with Pygame 2.x and Python 3.8+. Install via pip or drop a single file into your project — no extra dependencies required.
Install via pip (Recommended)
pip install bugnet-sdkFor memory usage reporting, install with: pip install bugnet-sdk[memory]
Alternative: Quick Install (single file)
Run one command from your Pygame project directory to download the SDK as a single file:
curl -s https://bugnet.io/sdks/pygame/install.sh | bashpowershell -ExecutionPolicy Bypass -c "& { iwr -useb https://bugnet.io/sdks/pygame/install.ps1 -OutFile $env:TEMP\bugnet.ps1; & $env:TEMP\bugnet.ps1 }"Manual Installation
- Download
bugnet_sdk.py - Place it in your project root (next to your main game script)
- Import and initialize:
import bugnet_sdk
Configuration
import bugnet_sdk

bugnet_sdk.init(
    "YOUR_API_KEY",
    "https://api.bugnet.io"
)
Reporting Bugs
# In your game loop, pass events to the SDK
for event in pygame.event.get():
    bugnet_sdk.handle_event(event)
    if event.type == pygame.KEYDOWN and event.key == pygame.K_F1:
        bugnet_sdk.show_widget()

# Call update() each frame for widget drawing and freeze detection
bugnet_sdk.update(screen, clock)

# Or report programmatically
bugnet_sdk.report_bug("Title", "Description",
    category="gameplay", priority="high")
Session Tracking
# Sessions start automatically on init.
# Call shutdown() when your game exits:
bugnet_sdk.shutdown()
Session Replays
Studio PlusWhen session capture is enabled on your project, the Pygame SDK records mouse movement, clicks, and key presses. Replay data is submitted alongside each bug report.
Enable session capture in Project Settings > Session Capture (requires a paid plan). No additional code is needed.
Event Tracking
Studio+Track custom analytics events from your game. Events are aggregated in the dashboard with daily trends, platform breakdowns, and unique session counts.
# Track a single event with optional data (max 4KB)
bugnet_sdk.track_event("level_completed", {"level": 3, "time": 42.5})

# Track multiple events in a single batch (up to 50)
bugnet_sdk.track_events([
    {"event_name": "item_collected", "event_data": {"item": "sword"}},
    {"event_name": "enemy_killed", "event_data": {"enemy": "boss"}},
])
Session Replays
Studio PlusSession replays let you see exactly what a player was doing before they submitted a bug report. The SDK records input events (mouse movement, clicks, key presses) and sends them to the server alongside each bug report.
How It Works
- Enable — Turn on session capture in your project settings (Settings > Session Capture). Requires the Studio Plus plan.
- Record — The SDK automatically records input events from the moment it initializes. Events are capped at 5,000 per session.
- Submit — When a bug is reported (manually or via auto-capture), the replay data is sent to
POST /api/session-replayswith the bug report ID. - View — Open any bug report in the dashboard to view the session replay in the detail panel.
Events Recorded
| Event Type | Data | SDKs |
|---|---|---|
mousemove | x, y, timestamp, screen dimensions | All |
click | x, y, timestamp, screen dimensions | All |
keydown | key name, timestamp | Web, Unity, Godot, Construct 3, GameMaker, Pygame |
scroll | scrollX, scrollY, timestamp | Web |
resize | width, height, timestamp | Web |
API Endpoint
Submit session replay data for a bug report. Requires X-API-Key header.
Payload
{
  "bug_report_id": "uuid-of-bug-report",
  "duration_sec": 120,
  "events": "[{\"type\":\"mousemove\",\"x\":100,\"y\":200,\"t\":1500,...}]",
  "metadata": "{\"platform\":\"Windows\",\"resolution\":\"1920x1080\"}"
}
Plan Requirements
Session replays require the Studio Plus plan. On the Indie (Free) and Studio plans, the SDK will not record or submit replay data. The server enforces this — even if a replay is submitted from a project that's not on Studio Plus, it will be rejected.
In-Game Widget
The Bugnet widget gives players a way to report bugs directly from inside your game. It opens a lightweight overlay with a description field, screenshot attach, and submit button — all without leaving the game.
Trigger Options
- Keybind — Call
ShowWidget()on a key press (e.g. F1) - Button — Call
ShowWidget()from your own in-game UI button - Automatic — Errors and crashes are auto-captured when
autoCaptureErrorsis enabled
Customization
The widget can be customized to match your game's visual style. You can configure the accent color, placeholder text, and which categories are shown to players.
Screenshot capture is automatic when the widget opens. This behavior is configurable — disable it if your game has sensitive content or if you want players to attach screenshots manually.